Implement Google Tag Manager on Shopify Checkout Page
Shopify’s checkout process has recently changed, deprecating legacy methods of adding tracking code. They have officially deprecated the checkout.liquid file for most merchants and is in the process of phasing out support for Additional Scripts on the Order Status page.
This shift was made to improve checkout security, maintain PCI compliance, and ensure consistent performance by preventing third-party scripts from directly modifying the checkout markup.
This implies that the old ways of adding tracking code, such Google Tag Manager (GTM), don't always work on the real Shopify Checkout Page anymore.
Shopify then came up with Checkout Extensibility, which uses a sandboxed environment for checkout scripts.
In simple terms, you can no longer freely edit the checkout pages unless you are on Shopify Plus; instead, tracking must be done through Shopify’s new Customer Events and Custom Pixels system.
Here’s the breakdown:
It requires a bit of JavaScript, but it’s the Shopify-supported way to run code on the checkout for tracking. We will walk through setting up a Custom Pixel that subscribes to checkout events and pushes them to GTM’s dataLayer.
This blog post will walk you through both approaches step-by-step, first for Plus stores using checkout.liquid, and then for Non-Plus using Custom Pixels. We'll also talk about how to set up GTM tags and triggers to track purchases and stop duplicate events.
Implement Google Tag Manager on Shopify Checkout Page – Shopify Plus Method
If you're on Shopify Plus, you can still modify the checkout.liquid layout file to add Google Tag Manager right to the checkout process. This offers you complete access to the HTML code for the Shopify Checkout Page, so you can put tracking containers exactly where you want them.
Follow these exact steps:
1. Access checkout.liquid in your theme code
- Go to your Shopify Admin.
- Navigate to: Online Store → Themes → [Your Live Theme] → Actions → Edit Code.
- Under the Layout folder, locate and open checkout. Liquid.
Don’t see checkout.liquid? Contact Shopify Plus support. Only Plus stores have access.
2. Inject GTM container in <head> and <body>
- In your GTM account, copy the full container snippet. You’ll get two parts:
- The <script> block (for <head>)
- The <noscript> iframe (for <body>)
Paste them exactly as follows:
liquid
1<-- GTM /HEAD - paste immediately after opening <head> --> 2<script> 3(function(w,d,s,l,i){w[l]=w[l]||[];w[l].push({'gtm.start': 4new Date().getTime(),event:'gtm.js'});var f=d.getElementsByTagName(s)[0], 5j=d.createElement(s),dl=l!='dataLayer'?'&l='+l:'';j.async=true;j.src= 6'https://www.googletagmanager.com/gtm.js?id='+i+dl;f.parentNode.insertBefore(j,f); 7})(window,document,'script','dataLayer','GTM-XXXXXXX'); 8</script>
1<-- GTM NOSCRIPT - paste immediately after opening <body> --> 2<noscript> 3 <iframe src="https://www.googletagmanager.com/ns.html?id=GTM-XXXXXXX" 4 height="0" width="0" style="display:none;visibility:hidden"></iframe> 5</noscript>
Replace 'GTM-XXXXXXX' with your actual GTM container ID.
3. Enable dataLayer tracking for checkout steps
Once GTM is live on your Shopify Checkout Page, confirm that your setup is pushing standard enhanced ecommerce events into the dataLayer.
Recommended custom events to push:
- checkout_step — on each step of the checkout
- add_payment_info — on the payment page
- purchase — on the Order Status page
You can push these manually via Liquid or JavaScript for implementation patterns.
4. Prevent duplicate Google Analytics (GA) tracking
Important: Shopify may already be sending GA events via:
- Google & YouTube App (GA4 integration)
- Native gtag.js installed in Additional Scripts
- Third-party apps like Elevar, Littledata, etc.
If you also launch GA events through GTM, you risk double-counting conversions.
Solution:
- Disable Shopify’s built-in GA settings if you use GTM.
- Or use a GTM-only GA4 implementation, fully managed inside your GTM container.
Shopify Plus merchants can deploy GTM on the checkout pages directly. Keep in mind that this direct-insertion method is temporary – Shopify’s deadline for fully removing checkout.liquid customizations are upcoming. It’s wise to plan a migration to the new extensible approach to future-proof your tracking.
Implement Google Tag Manager on Shopify Checkout Page – Non‑Plus / All Stores
For all other Shopify plans (and as the long-term solution for Plus), you will use Shopify’s Custom Pixel feature to run GTM on the checkout. This method works with Shopify's Customer Events framework, which executes your code in a sandboxed iframe when the customer is checking out. This is how to set it up:
Go to Settings > Customer events in Shopify Admin and click "Add custom pixel." You can add a custom script here to load GTM in the checkout sandbox.
1. Go to Customer Events and click "Add Custom Pixel."
- In Shopify Admin, go to Settings → Customer Events and click "Add Custom Pixel."
- Name your pixel, such as "GTM Checkout Pixel."
- This opens a code editor where you can write JavaScript that will run when someone checks out.
2. Load the GTM container inside the sandbox
Paste the following JavaScript in the editor (modify as needed):
JS
1// Load GTM container inside Shopify sandbox 2analytics.subscribe("checkout_started", (event) => { 3 window.dataLayer = window.dataLayer || []; 4 window.dataLayer.push({ 5 event: "checkout_started", 6 currency: event.currency, 7 value: event.totalPrice.amount, 8 items: event.lineItems, 9 email: event.buyerEmail 10 }); 11});
1analytics.subscribe("payment_info_submitted", (event) => { 2 window.dataLayer.push({ 3 event: "payment_info_submitted" 4 }); 5});
1analytics.subscribe("checkout_completed", (event) => { 2 window.dataLayer.push({ 3 event: "purchase", 4 transaction_id: event.checkoutId, 5 currency: event.currency, 6 value: event.totalPrice.amount, 7 items: event.lineItems, 8 email: event.buyerEmail 9 }); 10});
1// Dynamically insert GTM <script> 2(function(w,d,s,l,i){ 3 w[l]=w[l]||[]; 4 w[l].push({'gtm.start': new Date().getTime(), event:'gtm.js'}); 5 var f=d.getElementsByTagName(s)[0], 6 j=d.createElement(s), dl=l!='dataLayer'?'&l='+l:''; 7 j.async=true; 8 j.src='https://www.googletagmanager.com/gtm.js?id='+i+dl; 9 f.parentNode.insertBefore(j,f); 10})(window,document,'script','dataLayer','GTM-XXXXXXX');
3. Save and Connect the pixel
After pasting your custom code (and replacing the GTM ID with your own), click Save. After that, click the Connect button to turn on the pixel in your store.
As soon as you link this pixel, Shopify will start using it on checkout pages. To make sure the pixel is working, check the Customer Events list to see if it says "Connected."
The GTM container will load during checkout from now on, and the events you signed up for will be stored in GTM's data layer.
4. Debug using the sandbox iframe
Because the code runs in a secure iframe, GTM Preview Mode will not detect it.
To debug:
- Open the Checkout Page
- Open DevTools → Console
- In the top-left dropdown, switch from top to the context called: web-pixel-sandbox-CUSTOM-...
- Type: dataLayer to inspect real-time event pushes (e.g., checkout_started, purchase, etc.)
You can also verify tag firing using Google Analytics DebugView or your GTM container’s custom event listeners.
By using a Custom Pixel, even regular Shopify plans can deploy Google Tag Manager on the checkout. This method keeps Shopify secure (the code is isolated) while giving you the flexibility to track conversion events. Now we'll set up the GTM side to react to these occurrences.
Implement Google Tag Manager on Shopify Checkout Page – Configure in GTM
Once your checkout pixel starts sending events to the GTM dataLayer, you need to configure your Google Tag Manager container to handle them. This requires creating the correct variables, triggers, and tags. Do these things in your GTM workstation:
1. Create Custom Event Triggers
Go to your GTM workspace → Triggers → New.
For each event you pushed (from the Shopify Checkout Page), create a Custom Event Trigger.
Example:
- Trigger Name: Trigger – Checkout Started
- Trigger Type: Custom Event
- Event name: checkout_started
- This trigger fires on: All Custom Events
Repeat for:
- payment_info_submitted
- purchase (or checkout_completed, depending on what your pixel pushes)
These triggers will control when tags like GA4 or Ads fire.
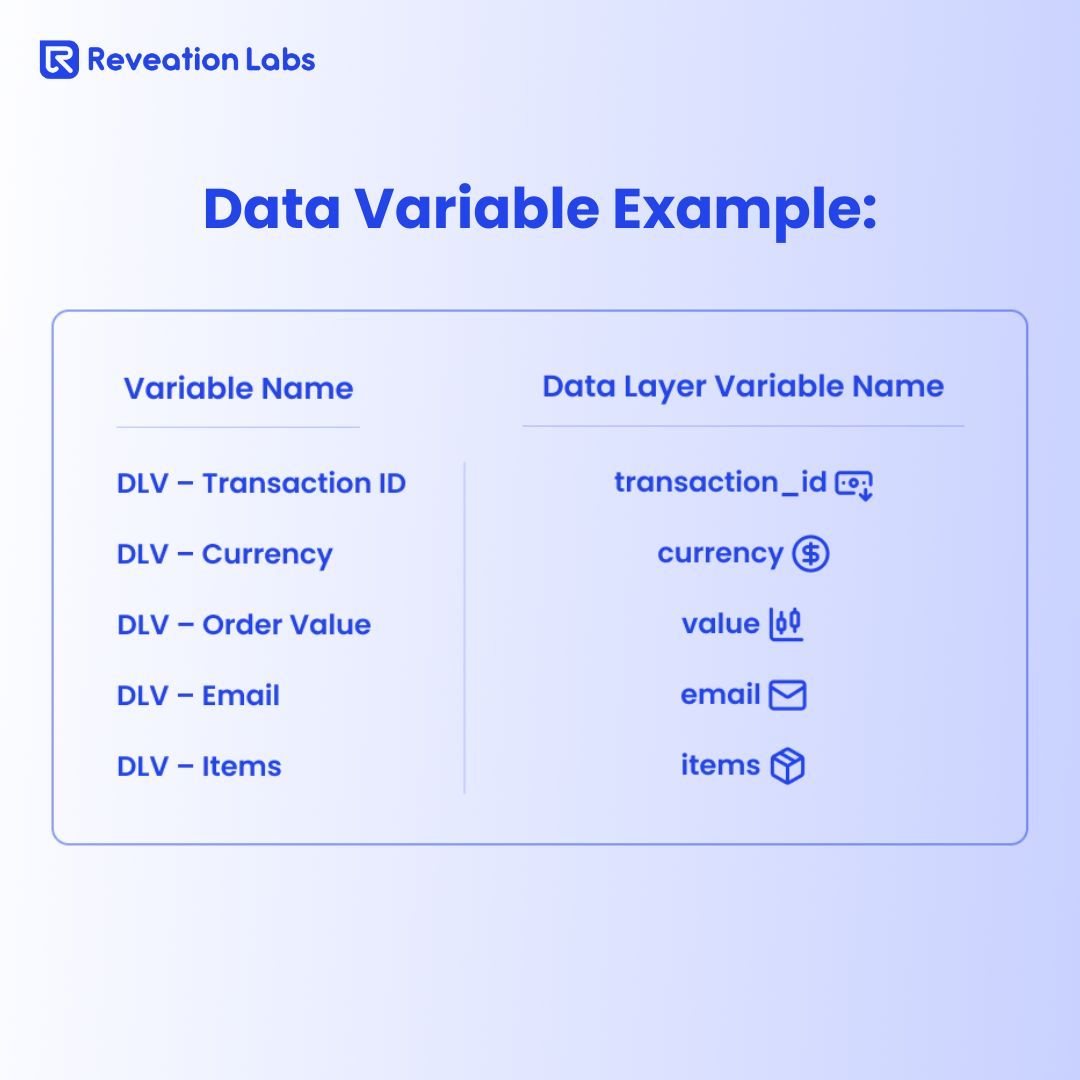
2. Define Data Layer Variables
Go to Variables → New → Variable Type: Data Layer Variable.
Create variables that match the data keys in your event payloads.
3. Set Up Tags (GA4, Ads, Meta, etc.)
Now build tags for each marketing platform.
Example: GA4 Purchase Event
- Tag Type: Google Analytics: GA4 Event
- Configuration Tag: Your GA4 config
- Event Name: purchase
- Event Parameters:
- transaction_id: {{DLV – Transaction ID}}
- currency: {{DLV – Currency}}
- value: {{DLV – Order Value}}
- items: {{DLV – Items}}
- email: {{DLV – Email}} (optional)
Trigger: Trigger – Purchase
Repeat similar tag setups for:
- Google Ads Conversion
- Meta Pixel (via custom HTML or CAPI helper)
- Any third-party analytics or ad tools
4. Publish the Container
After all the triggers, variables, and tags are set up, click "Submit" + "Publish"
5. Testing & Validation
This is Important:
GTM Preview Mode doesn't work in the sandboxed checkout iframe in Shopify.
Instead, utilize the DevTools Console to look at dataLayer inside the web-pixel-sandbox-CUSTOM-* frame (the same way as in Section 3).
- GA4 DebugView: Check that things like purchases are logged appropriately and that the numbers match.
- Network Tab:
Watch for network requests like:
- collect?v=2&tid=... (GA4)
- ads/ga-audiences (Google Ads)
- fbevents.js (Meta Pixel)
Keep in mind that the secure iframe will make GTM's preview mode seem blank during checkout events. Don’t be alarmed – as long as your Pixel is connected and your tags are set correctly, the events should be tracking. Confirm using the methods above.
You can also turn on Test Mode in Shopify.
To do this, go to Settings, then Payments, and then Manage. After that, turn on Test Mode. This lets you act out what you would do at a real checkout without using a real credit card.
Implement Google Tag Manager on Shopify Checkout Page – Best Practices & Caveats
There are some things you should know first before using GTM on Shopify's checkout.
1. Don't track the same thing twice (GA4, Meta, Ads)
Issue: When you use both Shopify's built-in integrations (such GA4 through the Google & YouTube app) and your own GTM container, activities like purchases can happen twice.
If you utilize GTM for Google Analytics, turn off Shopify's built-in GA4/UA tags. For each platform (GA, Meta, Ads), only use one source of truth.
* Don't use Shopify's default gtag.js with your GA4 setup that uses GTM.
Extra GA tracking can mess up your data and make it look like you have more conversions than you actually have.
2. Speed up the loading time of the GTM container
Adding GTM to the checkout flow makes it make external HTTP requests for gtm.js and any tags it loads after that.
Longer checkout times.
Tags flickering before purchasing.
Suggestions:
Load GTM and all third-party scripts asynchronously.
Put off running non-critical tags (like remarketing) until after the purchase.
To make the GTM container lighter, get rid of any triggers and variables you don't use.
To see how load affects checkout performance, use Google Tag Assistant or Lighthouse audits.
3. Legally respect privacy and consent
If your GTM setup gathers personal information like email, IP address, and things bought, you must have clear consent from the user before firing marketing or analytics tags.
Use Shopify's Customer Privacy API or Consent Tracking API.
You can add Google Consent Mode v2 to your GTM setup if you want to.
For example, only send push notifications if the user has accepted to cookies for marketing or analytics. Not doing this could contravene local privacy laws, GDPR, or CCPA.
4. Prepare for August 28, 2025 – Shopify’s Cutoff
As we said earlier, Shopify has announced that:
checkout.liquid and Additional Scripts will be fully removed for all merchants on August 28, 2025.
Implications:
- Shopify Plus stores must migrate to Checkout Extensibility.
- Custom Pixels will be the only supported way to inject GTM on checkout.
- Any tracking you inject via checkout.liquid will stop working.
Action Items:
- If you're still using checkout.liquid, begin transition now.
- Under Customer Events, move all GTM-based tracking to Custom Pixel.
- Keep your GTM logic compatible with the sandboxed execution context.
This can provide you with a far better understanding of the consumer journey without making the checkout process worse.
Looking to track conversions seamlessly? Our Shopify Plus Development Company helps you implement Google Tag Manager on the Shopify checkout page for smarter insights and better performance. Follow this GTM tutorial to optimize your eCommerce journey.